banana (or raspberry) pudding
|
|
 |
Serendipity. I borrowed this cookbook from the library, and mentioned it to a friend.
Said friend told me that when they were in NYC, it was highly recommended that they make a pilgrimage to Magnolia Bakery specifically for their banana pudding. So I had to try it. Plus, I love a recipe that is so simple you can do it from memory. I also love the inherent flexibility—I also used lemon cookies and raspberries, and will next try Oreos and bananas or coconut…maybe vary the pudding. Lot of possibilities. My only pet peeve on this recipe is that it asks for “4 cups of bananas” which is a unit not found in nature. Use 3-4 bananas, depending on how much you like bananas.
|
Whisk together water and condensed milk. Add instant pudding mix and whisk until all the lumps are gone. I tried using the KitchenAid for this, but whisking by hand is easier, and you need to save the KitchenAid for the heavy cream later, and so you won't have to wash it.
Once you have the condensed milk/Jello/water mixture is smooth, put it in the fridge to thicken up—about 3 hours. If you are in a rush, you can set it into the freezer for about 10 minutes, and then refrigerate for about an hour, with no penalty to texture.
Once the pudding is set (really set, not runny at all), toss 3 cups of heavy cream into the KitchenAid and whip until you have unflavored whipped cream. Don’t worry if it doesn’t taste like anything. It is more important that it looks like stiff whipped cream. Get the pudding from the fridge and fold/mix into the whipped cream. This will give it all the flavor it needs, and turn it a lovely mellow beige. You may taste test at this time, and you will not be disappointed.
Banana Option
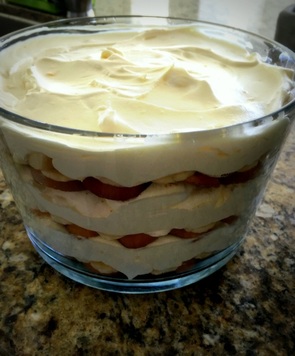
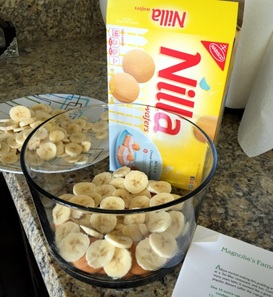
In the serving dish(es) of your choice, make a layer of Nilla wafers on the bottom. Then make a layer of sliced bananas. You don’t have to be particularly neat about it (see right). Layer on one-third of the pudding mix.
Repeat the Nilla wafers, bananas and pudding layer so that you will have three layers. Cover with Saran wrap and then let it sit for at least an hour. Somehow, the pudding magically absorbs the banana flavor.
Once you have the condensed milk/Jello/water mixture is smooth, put it in the fridge to thicken up—about 3 hours. If you are in a rush, you can set it into the freezer for about 10 minutes, and then refrigerate for about an hour, with no penalty to texture.
Once the pudding is set (really set, not runny at all), toss 3 cups of heavy cream into the KitchenAid and whip until you have unflavored whipped cream. Don’t worry if it doesn’t taste like anything. It is more important that it looks like stiff whipped cream. Get the pudding from the fridge and fold/mix into the whipped cream. This will give it all the flavor it needs, and turn it a lovely mellow beige. You may taste test at this time, and you will not be disappointed.
Banana Option
In the serving dish(es) of your choice, make a layer of Nilla wafers on the bottom. Then make a layer of sliced bananas. You don’t have to be particularly neat about it (see right). Layer on one-third of the pudding mix.
Repeat the Nilla wafers, bananas and pudding layer so that you will have three layers. Cover with Saran wrap and then let it sit for at least an hour. Somehow, the pudding magically absorbs the banana flavor.

Raspberry Option
See photo at left for the lemon cookies.
Same technique as with bananas and Nilla wafers. The raspberries do not infuse their flavor into the pudding as much as the banana, but it gives good 'bite' variety--crunchy cookie, tart raspberry, smooth pudding.
The choice of serving vessel is yours, (see note below), but regardless, it does need to sit for a bit. Eat and enjoy with your friends.
NOTES:
- This recipe makes A LOT of pudding. Make sure you have friends or co-workers around when you make it.
- I made this the first time in one of those deep glass bowls. That’s great for parties and Pinterest pics, but if you really want ease of eating and better long-term presentation value, I’m thinking lasagna-style in a 9 x 13 pyrex pan. Or serve ‘em in glasses or small teacups parfait style.
- The original recipes says not to let it sit for more than 8 hours. It’s true that after 8 hours, everything starts to settle, but even after a couple of days, it still looks pretty good and tastes fantastic.